Backup of RPI Installation
Motivation
While experimenting with the Raspberry Pi (RPi) it is not unlikely to end up with an installation which is no longer functional. If at all possible, undoing the changes to recover from a faulty installation may be cumbersome and time consuming. In such a situation having a working backup copy will be welcome.
A workflow how to create such a backup copy (image) is described here.
Workflow
A working installation (OS + other programs) of the RPi is stored on a SD-card denoted SD-card#1. SD-card#1 has a maximum capacity of C1 GB of which only U1 GB are used. Hence we have:
U1 < C1
(tool gparted may be used to find the amount of storage U1 actually used as compared to the maximum capacity C1)
To backup the content of SD-card#1 on another SD-card denoted SD-card#2 we consider the following cases:
- case#1: The maximum capacity C2 of SD-card#2 equals at least C1 or exceeds C1; C2 ≥ C1
- case#2: The maximum capacity C2 of SD-card#2 is less than C1 but larger than the actually used storage U1 ; U1 ≤ C2 < C1
But regardless of case#1 or case#2, the first step will be creating an image file of SD-card#1.
SD-card#1 is inserted into the PC (Linux).
To locate SD-card#1 on the PC we excecute the fdisk utility like this:
sudo fdisk -l

Disk /dev/mmcblk0: 29,71 GiB, 31902400512 bytes, 62309376 sectors
Units: sectors of 1 * 512 = 512 bytes
Sector size (logical/physical): 512 bytes / 512 bytes
I/O size (minimum/optimal): 512 bytes / 512 bytes
Disklabel type: dos
Disk identifier: 0x57785078
Device         Boot  Start      End  Sectors  Size Id Type
/dev/mmcblk0p1        8192   532479   524288  256M  c W95 FAT32 (LBA)
/dev/mmcblk0p2      532480 62309375 61776896 29,5G 83 Linux
The output of fdisk tells us that SD-card#1 is associated with device /dev/mmcblk0 with about 32 GB memory with partitions mmcblk0p1 and mmcblk0p2.
Copying SD-card#1 to a local image file is done using utility dd (disk dump) like this:
Note: set blocksize parameter bs to some larger value than the default to speed up copying. (the default blocksize is far too small …)
sudo dd if=/dev/mmcblk0 of=~/raspi_mbi1955_backup/raspi64bit_2023_02_19.img bs=1MB status=progres
If no errors occur the image is stored in file raspi64bit_2023_02_19.img.
case#1
Considering first case#1 when SD-card#2 can store at least the same amount of data as SD-card#1.
Although there are several options I found these steps useful:
- copy image file (eg.:
raspi64bit_2023_02_19.img) to an USB-stick - clone the image file on the USB-stick to SD-card#2 using a tool like Balena Etcher (available on Windows)
case#2
The maximum capacity of SD-card#2 is less than the maximum capacity of SD-card#1. The image file must be reduced in size first. This is done with the script pishrink. Most likely script pishrink will not be part of a standard Linux installation and must be downloaded.
https://github.com/Drewsif/PiShrink
We assume pishrink has been downloaded and then copied to the user’s local ~/bin directory. Parameters and options of pishrink are obtained running this command:
sudo bin/pishrink.sh

pishrink.sh v0.1.2
Usage: bin/pishrink.sh [-adhrspvzZ] imagefile.img [newimagefile.img]


  -s         Don't expand filesystem when image is booted the first time
  -v         Be verbose
  -r         Use advanced filesystem repair option if the normal one fails
  -z         Compress image after shrinking with gzip
  -Z         Compress image after shrinking with xz
  -a         Compress image in parallel using multiple cores
  -p         Remove logs, apt archives, dhcp leases and ssh hostkeys
  -d         Write debug messages in a debug log file
I have done some experiments and found that to run pishrink successfully options -s, -v, -r or -svr had to be used:
To shrink image file raspi64bit_2023_02_19.img and store the shrinked image file as raspi64bit_2023_02_19_.img run this command:
sudo bin/pishrink.sh -s -v -r raspi_mbi1955_backup/raspi64bit_2023_02_19.img raspi_mbi1955_backup/raspi64bit_2023_02_19_.img
And this is the output:
pishrink.sh v0.1.2

pishrink.sh: Copying raspi_mbi1955_backup/raspi64bit_2023_02_19.img to raspi_mbi1955_backup/raspi64bit_2023_02_19_.img... ...
pishrink.sh: Gathering data ...
Skipping autoexpanding process...
pishrink.sh: Checking filesystem ...
rootfs: recovering journal
rootfs: 176250/1918208 files (0.3% non-contiguous), 1755559/7722112 blocks
resize2fs 1.46.5 (30-Dec-2021)
pishrink.sh: Shrinking filesystem ...
resize2fs 1.46.5 (30-Dec-2021)
Resizing the filesystem on /dev/loop16 to 2005928 (4k) blocks.
Begin pass 2 (max = 266094)
Relocating blocks             XXXXXXXXXXXXXXXXXXXXXXXXXXXXXXXXXXXXXXXX
Begin pass 3 (max = 236)
Scanning inode table          XXXXXXXXXXXXXXXXXXXXXXXXXXXXXXXXXXXXXXXX
Begin pass 4 (max = 19275)
Updating inode references     XXXXXXXXXXXXXXXXXXXXXXXXXXXXXXXXXXXXXXXX
The filesystem on /dev/loop16 is now 2005928 (4k) blocks long.
pishrink.sh: Shrinking image ...
pishrink.sh: Shrunk raspi_mbi1955_backup/raspi64bit_2023_02_19_.img from 30G to 8.0G ...
The output of pishrink tells us that the original image file raspi64bit_2023_02_19.img has been reduced to about 8 GB and stored in file raspi64bit_2023_02_19_.img.
After shrinking the image should fit into a 16 GB SD-card#2.
We insert SD-card#2 into the PC (Linux). It is associated with device /dev/mmcblk0 as can be verified with fdisk .
The content of the (shrinked) image file raspi64bit_2023_02_19_.img is written to the 16 GB SD-card. Again command dd is used:
udo dd if=raspi_mbi1955_backup/raspi64bit_2023_02_19_.img of=/dev/mmcblk0 bs=50MB status=progress
Output...

8488911360 bytes (8,5 GB, 7,9 GiB) copied, 904 s, 9,4 MB/s
169+1 records in
169+1 records out
8488911360 bytes (8,5 GB, 7,9 GiB) copied, 904,18 s, 9,4 MB/s
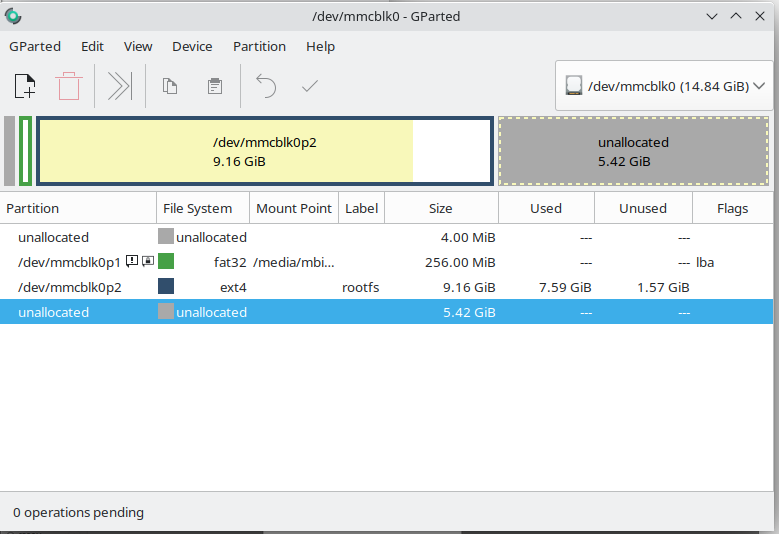
Finally SD-card#2 has been analysed with gparted after expanding partition mmcblk0p1 by a small amount (again using gparted).

After inserting SD-Card#2 into RPi, booting from this SD-card (16 GB) is successful. To use the full capacity of this SD-card requires to expand the partition. This can be done with the Raspi-Config tool of RPi.
Resources:
https://beebom.com/how-clone-raspberry-pi-sd-card-windows-linux-macos/
